| Whose already decking the halls? I am! Over the past few weeks I have been pulling my Christmas decor out in anticipation for the most wonderful time of year. I have also been doing a lot of crafting for this holiday season.  |
| With my love for jadeite and wanting to add to my jadeite collection but not wanting to spend a lot of money last year I attempted to make some jadeite colored ball ornaments for Christmas, the ones where you just squirt the craft paint in the ornament and swoosh it all around. I loved the idea but in the end they mostly turned out to be a hot mess with peeling paint and what not so I never shared. A definite Pinterest fail! LOL. This year I spied some jadeite colored milk glass ornaments that I fell in love with but with not wanting to spend $13 an ornament my DIY brainstorming began. I would post a pic of my inspiration but I do not want to get fussed at from the company that makes them. Once you see what I came up with you may know which ornaments caught my eye. |

Showing posts with label tutorial. Show all posts
Showing posts with label tutorial. Show all posts
Monday, November 9, 2020
Easy DIY Faux Jadeite Ornaments
Sunday, December 29, 2019
Easy Cabinet Makeover Using Peel & Stick Wallpaper

Sunday, March 31, 2019
Spring Carrot Tulip Wreath Tutorial
This past weekend I was working on the spring porch and needed two wreaths for the windows. I decided that I was going to finally try my hand at creating a carrot tulip wreath. These have been around for a few years and I have never been able to luck up on enough tulips until now.
 |
| There are many versions and tutorials out there of the carrot tulip wreath. After browsing them all I came up with my own version of how I wanted to construct the wreaths. I suggest that you browse them all as well and decide what way you think would be best for you. Total time to create one wreath for me was between 2.5 hours to 3 hours. |
Wednesday, November 21, 2018

Wednesday, February 14, 2018
Simple DIY Pantry Door Sign- Farmhouse Kitchen Style
I am one of those gals who really could care less about the Super Bowl. I was counting down to 'This Is Us'. LOL. While patiently waiting I decided to do a simple DIY project.
 |
Wednesday, March 15, 2017

Sunday, March 6, 2016
Quick & Easy Easter Wreath
The spring time weather is upon us here inSE Texas so that meant it was time to start sprucing up the front porch.
 |
Friday, June 12, 2015

Saturday, May 2, 2015
How We Made Our DIY Wood Beams
 |
| As promised I have put together a step by step guide on how we created our wood beams for our living room. We have wanted to add beams to our living room for years now and after researching all of our options, pricing faux wood beams and seeing wood beams in custom homes in our area we decided we could create our own and have them look just as amazing. |
Sunday, April 19, 2015
Quick & Inexpensive Spring Floral Arrangement

Tuesday, February 10, 2015
World Market Inexpensive Knock Off Wood & Glass Sign Tutorial
 |
| I am sure you have seen this sign from World Market. It has been all over blogland for awhile now. I have been wanting one for months and our World market never had it in stock and I was too stubborn to pay for shipping. Well now it is on Clearance and no longer available. Sigh. So what is a girl to do? So happens I had all the supplies to make my own version. |
 |
Saturday, November 22, 2014
DIY Light Up Vintage Santa Cutout

Monday, October 20, 2014
No Sew Fall Leaf Pillow
 |
| Over the weekend we took a trip to Ikea and I found some great fall plaid pillow covers. They were only $5 each which was a steal. When I brought them home I decided I wanted to embellish them. |
 |
Saturday, August 27, 2011
It Really Works!!
A few days ago I stumbled upon Laurie's French Flower Pot project! If you have not seen her incredible pots you must head over because I know they will inspire you as well! I will admit I was a tad skeptical that her technique involving just paper and Mod Podge was actually going to work but again her pots turned out amazing so I decided I had to give it a try!
 |
| Remember my caddy I found at HomeGoods a few weeks back? Yep, it needed some umph so I figured why not try Laurie's technique! |
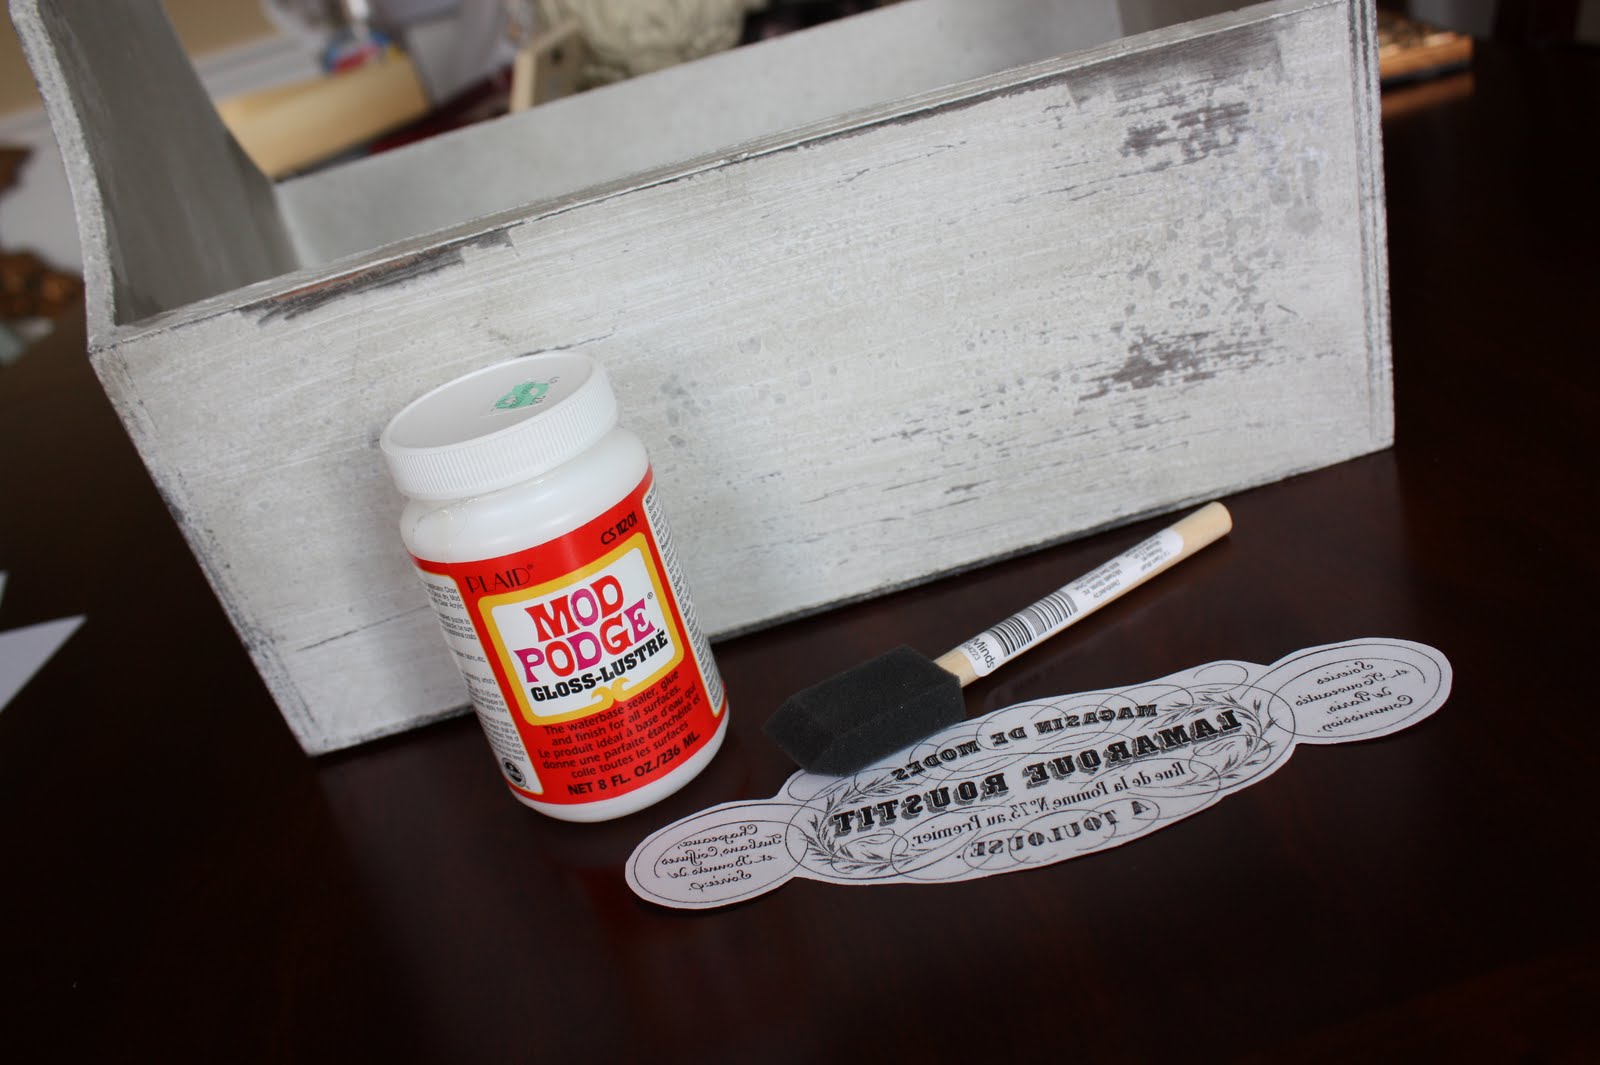 |
| I already had everything on hand so I had nothing loose! No money wasted if it did not turn out as I had hoped. I printed my image that I got off The Graphics Fairy site. I think I ended up choosing the exact same one that Laurie used but that was not intentional by any means. It just happened to be the only image I thought would look right on the caddy. I followed Laurie's direction and darkened the image just a tad using my Picnik account. It is free to sign up so no worries. It is a wonderful tool for us bloggers! |
 |
| Next I flipped the image which was easy to do in my printer settings and printed it out. Then I trimmed it to size. Next out came the Mod Podge. I coated the image as instructed to do so. You want to coat the ink portion that printed out. |
 |
| When centering the image and pressing it down I accidentally ripped the one side off but thankfully I was able to easily remove my Oops and started over. So be careful! |
 |
| Attempt #2 went much better! Now I am NOT as patient as Laurie and so I did not wait an entire night for it to dry. |
 |
| A few hours later after taking the hair dryer to it just to make sure it was indeed dry I dampened the image with just a moist paper towel. It needs to have enough water in it to squeeze a little here and there. |
 |
| After wetting it down I started the tedious process of LIGHTLY rubbing my wet finger over the paper removing the layers as instructed. I could NOT believe it this was actually working!! Here is a tip though-DO NOT trim your paper down so close to the image. Leave ya some room because you could potentially rubbed off the edge of the image. Yep, been there but in the end all was good. |
 |
| Here is the finished project! |
 |
| I just LOVE how it turned out and am sooo grateful that Laurie took the time out to show us how she accomplished this technique of image transfer! Thank you Laurie! |
 |
| I loved this process so much that I have my next victim all lined up! Stay tuned! |
 |
| Before I go, I thought I would also share that I found the cutest wire caddy for my antique silverware last week! Can you guess where I found it!? Yep, my most fave place in the entire world-HomeGoods!;) Hope your weekend is going well! Many prayers going up for those on the east coast. Linking up to the following linky parties: Saturday Nite Special-Funky Junk Interiors Sunday Showcase Party- Under The Table & Dreaming Metamorphosis Monday-Between Naps On The Porch Amaze Me Monday-Dittle Dattle Show Off Your Cottage Monday-The House In The Roses |


Subscribe to:
Posts (Atom)