Sunday, March 31, 2019

Spring Carrot Tulip Wreath Tutorial

This past weekend I was working on the spring porch and needed two wreaths for the windows. I decided that I was going to finally try my hand at creating a carrot tulip wreath. These have been around for a few years and I have never been able to luck up on enough tulips until now. 
Carrot Tulip Wreath-DIY-Spring-Easter-Home Decor-Farmhouse Style-Cottage Style-From My Front Porch To Yours
There are many versions and tutorials out there of the carrot tulip wreath. After browsing them all I came up with my own version of how I wanted to construct the wreaths. I suggest that you browse them all as well and decide what way you think would be best for you. Total time to create one wreath for me was between 2.5 hours to 3 hours.
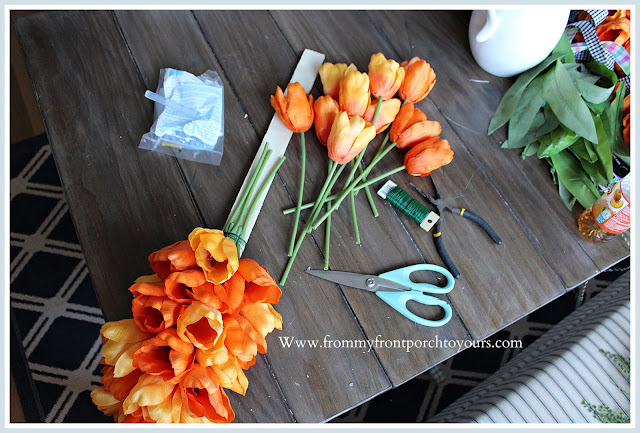
Here are the supplies that you will need to make one tulip wreath my way. All Supplies can be purchased at your local craft store.
-4 Orange tulip Bundles
-1 or 2 bundles of greenery
-Floral Wire
-Hot Glue Gun/Hot Glue Sticks
-Wire Cutters
-1.25 inch wide x 21 inch long lath of wood
-Ribbon/Bow
-D-Ring/Twine
Carrot Tulip Wreath-Tulip Bundles-Orange-Tutorial-From My Front Porch To Yours
You will want to deconstruct two of your tulip bundles. The tulips just slide right off. Be sure to take the leaves off as well and set them to the side for later.


Carrot Tulip Wreath-Tulip Bundles-Orange-Tutorial-Garden Lath-From My Front Porch To Yours
Many of the tutorials I read thru were only using florist wire and ribbon to create the wreath but I wanted something more substantial to support the tulips. It can get quite windy at times so I wanted to make sure that if I was putting the time/investment into making them that they would hold up for several years. This is where a piece of lath came into play. I already had it on hand because of a project I had just completed in our breakfast nook. It was the perfect width and length!

Carrot Tulip Wreath-Tulip Bundles-Orange-Tutorial-Glue Gun-Easter Porch-From My Front Porch To Yours
After gathering the deconstructed tulip bundle and grabbing the piece of lath I took one tulip and glued it to the center of the lath. You will have to hold it in place for a few till the glue somewhat hardens.

Carrot Tulip Wreath-Tulip Bundles-Orange-Tutorial-DIY-Home Decor-Cottage Style-Farmhouse Style-From My Front Porch To Yours
Next I glued another tulip to the side of the first and then one more to the other side. You will need to make 5 to 6 rows of three tulips going up the lap. Make each row a little shorter. You do not want all the tulips to gather at the same length.

DIY-Carrot Tulip Wreath-Tulip Bundles-Orange-Tutorial-From My Front Porch To Yours
After each set of three I trimmed the stems of the tulips. This step is optional. For me it was easier to place more tulips and glue. 

DIY-Spring-Carrot Tulip Wreath-Tulip Bundles-Orange-Tutorial-Home Decor-Cottage Style-Farmhouse Style-From My Front Porch To Yours
After two layers of tulips I decided that in case the hot glue for some reason was not enough that I would secure the tulips with florist wire as well.

Carrot Tulip Wreath-Tulip Bundles-Orange-Tutorial-Home Decor-Cottage Style-DIY-From My Front Porch To Yours
These tulips are not going anywhere!

DIY-Carrot Tulip Wreath-Tulip Bundles-Orange-Tutorial-From My Front Porch To Yours
As I mentioned you will do 5-6 rows of three going up the lath. You will end up with probably 10 extra tulips. Sit those to the side. They will be used to fill in any holes/gaps at the end.

Carrot Tulip Wreath-Tulip Bundles-Orange-Tutorial-Spring Decor-Spring Porch-From My Front Porch To Yours
Next up grab one of the non deconstructed tulip bundles. Cut the leaves off but leave the rest in tack. Place it on the lath to see where you think it looks best to fall in place with the tulips that are glued to the lath.

DIY-Carrot Tulip Wreath-Tulip Bundles-Orange-Tutorial-Home Decor-Spring-Easter-From My Front Porch To Yours
I wired the bundled at the length that I liked for the next "row" of tulips.

Carrot Tulip Wreath-Tulip Bundles-Orange-Tutorial-Spring-Decor-Easter-DIY-From My Front Porch To Yours
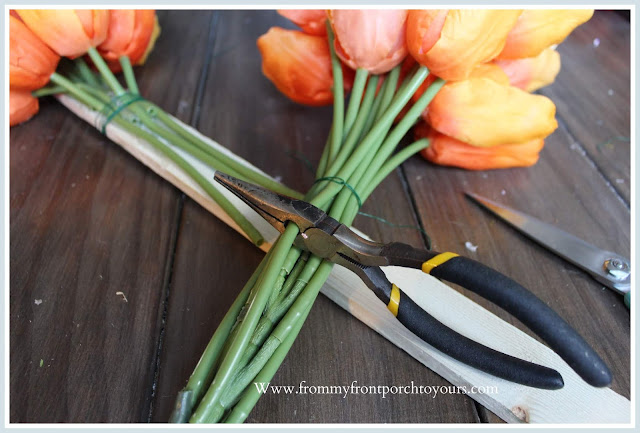
Next I used wire cutters to cut off each individual tulip. 

Spring-Easter-DIY-Carrot Tulip Wreath-Tulip Bundles-Orange-Tutorial-From My Front Porch To Yours
It was a bear because our wire cutters have seen better days but if your's are fairly new it should be a breeze.

Carrot Tulip Wreath-Tulip Bundles-Orange-Tutorial-From My Front Porch To Yours
Next is where the leaves come into play. I glued them to cover up the florist wire on the back of the lath. I think it gives the wreath a more finished look even though nobody will see the back.

Carrot Tulip Wreath-Tulip Bundles-Orange-Tutorial-Spring-DIY-Porch Decor-From My Front Porch To Yours
After adding the leaves wire the bundle of tulips to the lath where you want it and then glue two leafs around the lath to cover up the wire.

Carrot Tulip Wreath-Tulip Bundles-Orange-Tutorial-Greenery-DIY-Cottage-Farmhouse-From My Front Porch To Yours
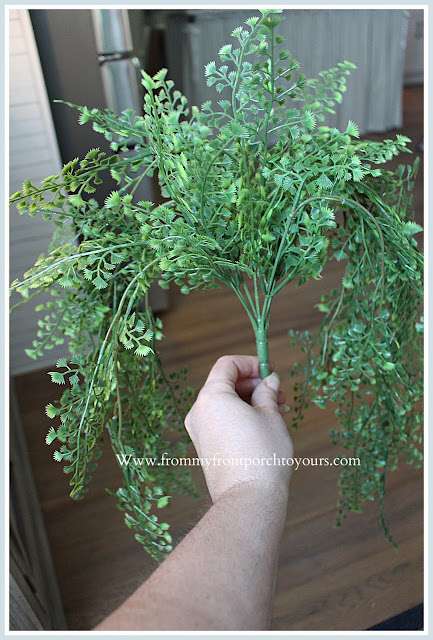
Next grab your greenery/carrot topper. I wanted my topper to sweep down the sides but there are many other options for the topper. Just browse and pick one you think you will like. 

DIY-Carrot Tulip Wreath-Tulip Bundles-Orange-Tutorial-Spring-Easter-Home Decor-Porch-From My Front Porch To Yours
You will want to place some glue on the wrapped around leaves and then slide the greenery into place.The greenery stem will easily slide down into the tulips. After it is dry then wrap another two leafs around the center to cover up the greenery stem.

Carrot Tulip Wreath-Tulip Bundles-Orange-DIY-Wreath-Tutorial-Easter-Spring-Home Decor-From My Front Porch To Yours
At this time you can also either add a D-Ring for hanging or just use twine. I didn't have any D-Rings on hand like I thought that I did so I just improvised with the twine.

Carrot Tulip Wreath-Tulip Bundles-Orange-Tutorial-DIY-Home Decor-Spring-Easter-Porch-From My Front Porch To Yours
Here is how your wreath will look thus far.

Carrot Tulip Wreath-Tulip Bundles-Orange-Tutorial-From My Front Porch To Yours
I wanted to add a little more height to my carrot so I used a few springs of another type of greenery and slid them into the top of the wreath. They held snug due to having wrapped the stem of the first greenery with leaves.
DIY-Carrot Tulip Wreath-Tulip Bundles-Orange-Tutorial-From My Front Porch To Yours
Next look for any holes that you might see. This is where the extra tulips come into play. I probably used about 5 to fill the wreath in. I just trimmed the stems to the length I needed and then placed glue on them to slide them into place. Give it a few minutes to let the added tulips dry in place.

Carrot Tulip Wreath-Tulip Bundles-DIY-Tutorial-Easter-Spring-Home Decor-Front Porch-Cottage-Farmhouse-From My Front Porch To Yours
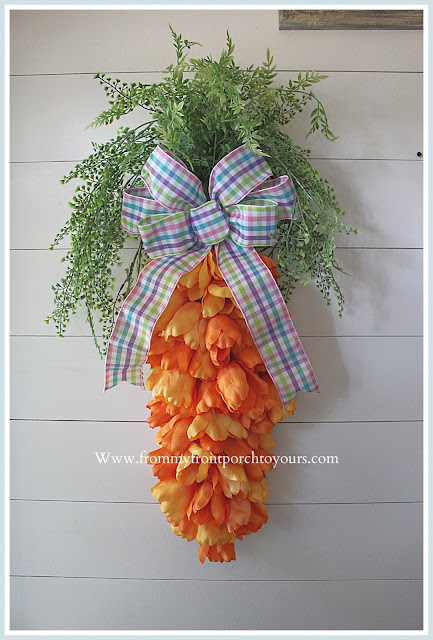
After that all you need to do is add your bow!
If you happen to make one and are on Instagram be sure to share your creation and use the hashtag #carrottemogitulipemogiwreath so I can see!

Stop back by to see our Spring/Easter porch. I will also be sharing our breakfast nook makeover soon as well. You will not want to miss it!

EDIT: At this time I for some reason I am not being allowed to leave individual comments but I want to thank all  of you for visiting and your kind words! I need to just break down and get a new computer. LOL. 
Sharing at these fabulous spots:
Between Naps On The Porch
A Stroll Thru Life
Refresh Restyle


10 comments:

  1. Very pretty. Thanks for sharing.

    ReplyDelete
  2. Your carrot wreath is so intriguing. Thanks for all the detail. What makes it look especially authentic are the leaves. They are so feathery and just like carrrots. Where did you buy those? Thanks so much.

    ReplyDelete
  3. So adorable! I need to go now, headed to Hobby Lobby. :)

    ReplyDelete
  4. Pamela, What a clever wreath. Nice that you showed exactly how to make one. Blessings to you, xoxo, Susie

    ReplyDelete
  5. So clever and pretty. Great job Pamela. Have a great start to April.
    Hugs,
    Kris

    ReplyDelete
  6. Okay... I LOVE this wreath! So unique, and your tutorial is GREAT! One question, when you go to add the greenery bundle, you have glue *on top* of the leaf-wrap, but it looks like the greenery is slid *underneath* the leaf wrap. Why is there glue on top? Or am I looking at it wrong? We would LOVE to have you join us each week at Homestyle Gathering via myweeabode.com . ;-)

    ReplyDelete

I love when ya stop by so leave me a comment if ya have some time! I always try and respond but sadly enough sometimes I am unable to return the love due to noreply blogger status.