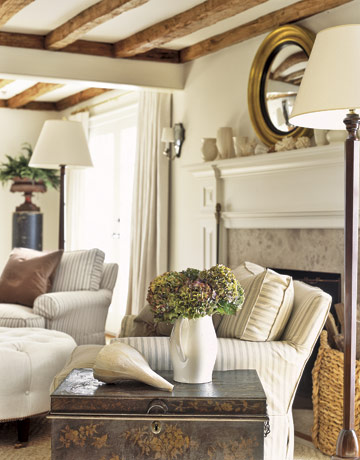
To say I love the French Country/Cottage look is an understatement.
 |
| Country Living I think it is because you will always see old mixed in with the new making for rustic charm. |
 |
| Traditional Home Nothing screams rustic charm more to me than wood beams. |
 |
| Decorpad I long to add wood beams to our home. I have grand plans for our living room in the summer if we do not end up being relocated. Till then I came up with a plan to get that rustic charm I have been longing for. |
 |
| Yep, these are the boards I stained earlier in the week. I had grand plans for them! |
 |
| Boring hallway now has faux wood beams added to the top of the doors. |
 |
| I decided to take them on into our master bath as well. I felt that this area needed a pop of something. |
 |
| The boards add so much more life to this area and the entire bathroom for that matter but I am not ready to share it all yet!;) |
 |
| And of course I could not resist adding "beams" to the guest bedroom hallway! |
 |
| And since the hallway got some rustic charm I had to bring it on into the guest bedroom as well to complete the look. |
 |
| Even the doorway to the guest bathroom got some rustic charm. I love how the "beams" flow with other elements in the room like the stained plantation shutters in the bathroom. |
Linking up to the following link parties:


That adds a really nice touch Pamela! Perfect for adding rustic charm on a budget and for those not in a permanent home!
ReplyDeleteLorraine
You are good girl. Those look awesome indeed!
ReplyDeleteThis project turned out beautifully. The dark "beams" really bring your eye up to the top of the door making the space look taller. Great idea.
ReplyDeleteTraci
ps. I love the colors in you new header.
I love it Pamela. It adds great character, and warmth. Nice idea.
ReplyDeletewhat a wonderful idea it looks beautiful i love it xxx
ReplyDeleteI'm really liking your wooden beams over the doorways. Great look!
ReplyDeleteMary Alice
Looks great Pamela!! What a neat touch!! Thanks for linking up!! :)
ReplyDeleteWhat a fantastic idea Pamela! It totally fits with the look you are going for and looks just awesome. Well done girl! :-)
ReplyDeleteVanessa
P.S. Thanks for sharing it at Inspiration Friday!
Pamela I love the new look!
ReplyDeletePamela this is genius!!! I grew up in a home with gorgeous vaulted ceilinged living room with exposed beams. I have always longed for that look, and it goes without saying, this Francophile is gaga for French Country anything! I love this idea, adding to my ever overflowing project list. Good thin I can pin it! It will be there for me when I finally get to it!
ReplyDeletePamela,
ReplyDeleteWhat an awesome idea with the wood above your doorways...LOVE IT!!! I also LOVE your new blog look:)
Blessings,
Linda
Wow,
ReplyDeleteThe wood adds so much charm and character! Absolutely beautiful!
Blessings...
That looks great Pamela! I do believe you have achieved the look you were going for!! Enjoy your weekend and Happy St. Patrick's Day, Gail
ReplyDeleteIt looks fabulous!!! I have been thinking about doing the same thing above the windows in my living room and dining room because they had them originally. Then when the house was "remodeled" in the 1890's they plastered over them. Have a great weekend :o)
ReplyDelete~Des
That wood is just the right amount of rustic. The stain is perfect!
ReplyDeletewhat a statement! it looks gorgeous! great idea!
ReplyDeleteWow!!!!Pamela Wow!!!! What a fabulous idea, You are so clever, I love it, You're right it's just what it needed but it look's like it was always there. Perfect.
ReplyDeleteI love this project! It looks wonderful!
ReplyDeleteI was wondering what you were doing with all that wood...Nice headers over your doors!!
ReplyDeleteI have similar headers, but I painted them white..Love yours stained!
What a great idea! Really adds a special touch doesn't it? I love the chandy! I think a tall mirror would look beautiful in that space.
ReplyDeleteYou are very talented. Hope you have a great weekend and Happy St. Patty's Day!
Pat
What a fantastic idea! I love how much it adds for so little moola! Way to go! Hugs, Leena
ReplyDeleteClever idea it looks good.
ReplyDeleteI love the chandelier hanging int the corner very pretty.
love the way this looks, did you just use pine boards and what color stain did you use?
ReplyDeleteWOW~! That turned out wonderful. I am really loving that!
ReplyDeletePamela, these are awesome! What a great touch for your home!! Love those inspiration photos, too!
ReplyDeleteWhat a difference and so simple!
ReplyDeleteYou`re a genius!
S
xo
Hi! I'm new to your blog and I just love it! Love what you did here adding the rustic charm. It came out great!!!
ReplyDeleteA very simple idea, nice work! I put faux beam headers above our window headers that look great...but I might like this look just as much! http://www.owtraditions.com
ReplyDeleteHow exactly did you attach the boards to the wall? Did you glue and nail or just nail them? If you nailed them, how did you cover the nail holes? Thank you for your reply! I totally love your style of decorating.
ReplyDeleteVickie I used a dark screw and just screwed them into the wall so if and when I tire of them I can just take um right off. Because of the dark stain you do not even see the screws.
DeleteWould like to know the name of the paint color in hallway of guest bedroom please
ReplyDeleteSherwin Williams Camelback
Delete