***Since doing this tutorial I have finally completed our kitchen reno!:) To see the completed kitchen with the cabinet doors back on click here and here.***
 |
| Here is what I had to work with. Dark cabinets in a small space. I wanted to lighten and brighten our kitchen up. |
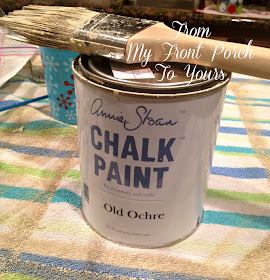 |
| I decided to use Annie Sloan Chalk Paint in Old Ochre.I used chalk paint because it requires little to no prepping. All I did was wipe down the cabinets and dry them then started painting. |
 |
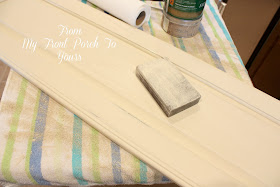
| I distress my edges by lightly sanding in a circular motion. |
 |
| After I was done sanding I pulled out my Country Grey Chalk Paint. |
 |
| I used this color to highlight the inside of the panels on the front of the cabinet doors. |
 |
| After the Country Grey I went back over the edges of the panels with a light brushing of Versailles. |
 |
| Once completed with highlighting the panels with contrasting paint colors I pulled out my clear wax and dark wax. |
 |
| Adding the clear wax will change the color of your paint slightly. Keep this in mind when you are choosing a color. |
 |
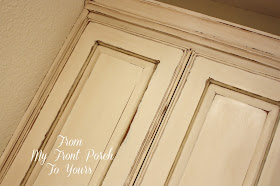
| Here is the completed finish! |
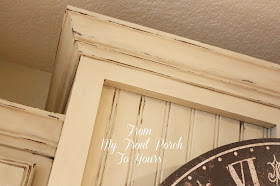 |
| I know this finish is not for everybody but I just love the rustic charm it adds to our kitchen. |
Linking up to the following parties:





Wow! That looks amazing! What a great tutorial, thanks for sharing this. Your cabinets look great!
ReplyDeleteAmazing transformation ! Thanks for all your tips :) Love your cabinets !
ReplyDeleteLove love love it!! You did a fabulous job on them Pamela!
ReplyDeleteYou did a fantastic job! You arms and hands must be so tired?! But will be lookin good for sleeveless shirts coming up! Lol. The transformation is amazing! Love it! I have all white cabinets and have given thought to antiquing them. Maybe someday. :). Beautiful!
ReplyDeleteGorgeous Pam!! I love the color choices!!
ReplyDeleteI love it!!
ReplyDeleteYou are a genius!!!
I am a big fan of your work.
Kisses from Argentina
Maru
Pamela,
ReplyDeleteWow. WOW. Wow. Your step by step instructions were amazing, thank you! I liked your kitchen before, as I love dark colors, however, after seeing a glimpse of the new look, I like it even BETTER! You actually made me think of running out to get a can of chalk paint and wax. I will be anxiously awaiting the full reveal, can't wait! :) How exciting it is to transform the kitchen, the heart of the home. :) Thanks for sharing! xo ~Liz
Pamela
ReplyDeleteI am obsessed with this project. Your microwave looks like mine. Do you know the length of your micro? I really want to move my cooktop off my island. My husband is fixated on "what will we do with the microwave." And, he thinks we will have to remove the surrounding cabinets and crown molding. Love following this project- laura
I am not sure the size Laura. It was just one we found at Target.
DeleteOh my word Pamela!!! That finish is just gorgeous!!! Seriously I cannot wait to see the final results and I know it will be amazing. Makes me want to tackle my own kitchen now...or at least maybe the island. LOL!
ReplyDeleteVanessa
Your new kitchen is beautiful. I'll be doing my own soon. Where did you get your cabinet nobs? Love the clear glass.
ReplyDeleteNot sure if she got them there but they sell them at Hobby Lobby and they're EXPENSIVE....$7.99 EA :( I absolutely LOVE these but I can't afford to buy 27 of them for my kitchen.
Deletehttp://shop.hobbylobby.com/products/clear-glass-umbrella-knob-with-metal-base-256073/
Yes, they came from Hobby Lobby but I purchased them at 50% off so they were not that expensive.
DeleteQuality pulls are going to run $3 or higher - worth it in the long run
DeleteYou did a great job and this and thank you for sharing. I'm going to pin this and put this link on my website. Thanks for sharing!
DeleteLove the finish Pamela! I too love a distressed finish...keeps me from worrying about nicks and dings.
ReplyDeleteGreat tutorial, your cabinets look beautiful. Hugs, Marty
ReplyDeleteLove, love, love. An amazing amount of work but so worth it. Thank you for the tutorial. I'm going to try it on a small cabinet before I commit to my entire kitchen.
ReplyDeleteGreat job Pam!! That's a lot of work, but gorgeous!!
ReplyDeleteDid you paint over your old finish? Or, did you have to prepare the wood, before? Simply beautiful look!
ReplyDeleteWonderful tutorial Pamela! They look fantastic and I know it was quite a lot of work! You should be quite happy with the result though and I can't wait to see the whole kitchen! Yay for painting the cabinets!!
ReplyDeleteGreat tutorial, even better finish job! I waxed my island in the kitchen 4 years ago and it is still going strong and in great condition! I'm sure you love these cabinets now!- Susan
ReplyDeleteKitchen looks amazing, Pamela! Looking forward to see some more pics :) Autumn greetings from Australia♥ ~Pernilla
ReplyDeleteSo lovely! You've done an amazing job.
ReplyDeleteWonderful job! Worth the effort! How many cans of chalk paint did you go through??
ReplyDeleteGorgeous Pamela!!! Love your beautiful painted cabinets and your technique! Isn't it wonderful adding that light into your kitchen! I could not be happier with mine :-)
ReplyDeletexx
Anne
Love what you did!!! You have truly transformed your kitchen to an absolutely beautiful place... I saw that same clock the other day at Home Goods & loved it!
ReplyDeleteLove what you did!!! You have truly transformed your kitchen to an absolutely beautiful place... I saw that same clock the other day at Home Goods & loved it!
ReplyDeleteGorgeous, Pamela! Your hard work paid off; your cabinets are stunning! Thanks for sharing the great tutorial! I always love seeing how finishes were achieved! Love it!
ReplyDeleteI love it all! That's how I sand too, the finish is so much smoother :) Love the tile too!
ReplyDeleteDebbie
The cabinets are beautiful! I love them!...Christine
ReplyDeleteOh my gosh Pamela! I love your cabinets! You are a master of painting with chalk paint and get incredible results. Thanks for your tip about sanding with a wet block. I have not tried that before, but I will now.
ReplyDeleteHi, Your cabinets look beautiful! Really amazing job! I also did my kitchen cabinets very close to what you did. I love how it lightens and brightens everything in the kitchen. If you search back through my archives you can see how mine turned out.
ReplyDeleteI LOVE this finish, Pamela! Thanks for showing us how it's done.
ReplyDeleteJeanette
You are doing an amazing job, look's gorgeous.
ReplyDeleteIt's me again with a question on your cabinets. Are you using an electric buffer or just buffing it all out by hand. I think I stalled at one coat of wax because the buffing was so hard. Is hand buffing giving you an even looking finish? Thank you so much for taking the time to read and answer. Blessings to you, Patti
ReplyDeleteWe bought a house with very dark cabinets and I have been trying to decide to paint or not and after seeing yours I really want to brighten and lighten ours too! Thanks for the tutorial!
ReplyDelete~Pendra
It looks fabulous, Pamela! Looking forward to the big reveal!!~~Angela
ReplyDeleteBEAUTIFUL!!!!! I love it...so nice! I have similar cabinets in the kitchen that I did myself...but, I need cute knobs now!
ReplyDeleteJulie
Amazing transformation. I cant wait to see the final product. Great job!
ReplyDeleteSarah
just fabulous. thanks so much for sharing your technique!
ReplyDeleteEverything is looking so lovely and thanks for sharing how you achieved this looks. Love it!
ReplyDeleteCynthia
So aweswomely beautiful! I wish my cabinets had the same detailing as yours. They're dreamy. Great job!
ReplyDeleteKelly
WOW WOW WOW..those cabinets look incredible Pamela. What an awesome job you did!
ReplyDeleteIt's gorgeous! We also used ASCP to redo our kitchen cabinets last fall and they have held up beautifully. I also distressed them but didn't use the dark wax as I wanted to keep it a bit lighter and used Old White instead of Old Ochre. I'm really happy with the results and how they have stood up with their clear wax finish (2 coats).
ReplyDeleteLove how yours are so warm and creamy looking.
Found you through Hometalk.
Your kitchen cabinets look a-mazing! I actually hired a painter to do the exact same thing to mine. He achieved the same look that you did on your own. I will remember the wet sanding technique. Fabulous job and what a difference! ~Delores
ReplyDeleteYour kitchen is gorgeous and just my style! Hubby and I are also beginning our own kitchen DIY and French Country is my style. I've been ogling Annie Sloan paint for awhile and with your reveal, I think you've convinced me that it is worth the cost. Beautiful!
ReplyDeleteGorgeous; and you know how much these would cost to have built custom and installed? Answer: an arm and a leg. So, a few hours invested is well worth it. Men are so hard to convince on these things....
ReplyDeleteWow, wow, wow! What a transform ! You did a fabulous job and your kitchen looks awesome.
ReplyDeleteBEA.UTI.FUL!!! I love this. My kitchen cabinets are like this from the manufacturer, so it's nice to see that I can recreate that look should we move to a house with dark wood. Great job.
ReplyDeleteWonderful tutorial. Old Ochre is my favorite Annie Sloan color. I didn't know about getting the sanding block wet to cut down on the chalk dust. I'll have to try this. Your kitchen looks amazing.
ReplyDeleteWow! I cannot wait to see the whole kitchen now. All I can say is your are quite talented and patient. I have painted cabinets before and know how extremely tedious it is. To do the finish you have done is a lot of hard work but certainly well worth it. Your cabinets are gorgeous!
ReplyDeleteWow!!! These came out absolutely beautiful. You must be thrilled....can't wait for the full reveal!
ReplyDeleteHoly ba-Geezes!!!! Those look FAN-FREAKIN-TASTIC! That's it. I'm soo comin ova! ;)
ReplyDeleteI have the cheap, cheap laminate cabinets. Would love to replace but not in this day and time. Does anyone know if I can paint them with Annie Sloan Chalk paint? I know all about cleaning them first, etc. but just don't know if I could use this paint.
ReplyDeleteI absolutely love this!!!...Have bought my Annie Sloan paint and waxes, now to get started!
ReplyDeleteI love your kitchen! I have been looking for the perfect backsplash to go with my Old Ochre cabinets, and you have nailed it! Do you know what color your travertine and grout is?
ReplyDeleteThanx Krystal! Off the top of my head I do not remember. The next time we go to Floor & Decor I will look to see what the tile is called. The grout we purchased at Lowes. It is premade. I will have to look for the color.
Deletei would like to know if after all this time..do they still look nice? are you happy with your decision to just use the wax?
ReplyDeleteyour cabinets look fabulous!! i only hope mine come out this good!
Chris thanx for stopping by! They look just as good as they did from day one! I have waxed chalk painted cabinets in our guest bath as well and that was three years ago and they too still look fabulous. I have not reapplied any wax to them. I suggest if you have any worries though that you use a different top coat from wax. You have to know how to properly apply the wax or it will not hold up. There is a lot of rubbing and buffing involved. Wax hardens over time and if you put it on too thick it will take a lot longer for it to harden. Normal cure time is 30 days.
DeleteAmazing and beautiful!! Thank you so much for the great tutorial!!
ReplyDeleteDid I understand correctly that you only used the Country Grey on the tiny border on the inside little trim of the front door and then the Versailles over that or was the Versailles on the very edge of the doors?? Thanks!
Lori, yes Country Grey and then Versailles lightly over it.
DeleteYour cabinets look fabulous!! LOVE the French Country look. How is the Annie Sloan chalk paint holding up in the kitchen? I thought about painting my daughter's bathroom cabinets with ASCP but i didn't know how it would hold up in a high moisture area. I also want to paint my dark kitchen cabinets as well and i love the fact that the only prep is to wipe down the cabinets.
ReplyDeleteHi Wendy. I think I sent you an email but not sure and I wanted to make sure to answer your question. Three years ago I painted our guest bath vanity with AS and have had zero issues with it. Still looks good as day one and I have not even waxed it again. The kitchen cabinets were done a little over a year ago and I still love them! If you tend to splatter and are a avid chef I would look into a different top coat other than wax. I believe Annie carries one. I just did not have a chance to get it at the time. Again though my cabinets have held up wonderfully.
DeleteI love your cabinets, and I am about to give this a try. I purchased all of the Annie Sloan products. At the store I purchased it from, I asked about using the different top coat. They said it wouldn't adhere to the wax that was used in the distressing process. If I don't use the wax, would I use a clear sealant and then use a glazing paint to get the distresses look? Then cover again with a sealant? I just wanted you opinion? Thanks.
DeleteHi Unknown! Yes, I would say use the clear sealant then glaze and then seal again. That way the sealant will not soak into your paint and ruin your paint job. Indeed Sealant will NOT stick to the wax. Have fun transforming your kitchen!
DeleteI ABSOLULUTLY love how your cabinets turned out. I am IN LOVE with chalk paint. Your kitchen is similar in size to mine and I plan to reno SOON. Just curious, how much chalk paint did it take? I cannot find it locally, and I have made my own for small projects, however for my kitchen I will buy ASCP just trying to get an idea on how much to purchase :-)
ReplyDeleteHi Tammie! I purchased two cans of Old Ochre and had probably a half a can left if I remember correctly.
DeleteAwesome! Thanks so much!
DeleteThis comment has been removed by a blog administrator.
ReplyDeleteYour kitchen cabinets look beautiful. I did the same to mine about a year ago. And I can tell you that this ANNIE SLOAN CHALK PAINT does not hold up in the kitchen. EPIC FAIL. The wax will not act as a sealant which is needed in a kitchen where there is actual cooking going on. I did the same to my kitchen and they did turn out very nice, but after all of the money I spent and time and energy in doing this project, it was not worth it. The upper cabinets are fine, its the lower ones, where like water, greese, food etc..., could end up. I reported this to AS too, but no use, they don't care. I would not recommend using the paint at all. PERIOD!
ReplyDeleteBeverly, I agree that I would not use wax on the cabinets in a kitchen. It is just what I had on hand and since I was only painting the upper cabinets I went with it. There is no reason that somebody can not use AS paint to paint their cabinets. If their kitchen is a high traffic kitchen and gets a lot of use then I recommend using a clear sealer instead of a wax. Clear sealant will protect your cabinets from any stain or oils that may get on them.
DeleteHi :) Your kitchen is absolutely beautiful!! What color dark wax did you use? There were several options on website and I would like to paint my cabinets the same color. Also, did you paint over the country grey with the Versailles? Hope to hear from you soon :) Thank you so much! I want to order paint ASAP
ReplyDeleteThank you for the post. Your kitchen is beautiful. Would you happen to remember where you purchased the whit roosters?
ReplyDeleteRenee they came from Home Goods a few years back.
DeleteThanks for sharing with us such great informative post. Keep up nice work guys!! Health Insurance Palm Bay
ReplyDeleteLOVE everything! Beautiful! May I ask where you got the cabinet knobs? TY!
ReplyDeleteHi Pamela, I hope you could reply soon. I am about to start a redo in my kitchen. I have researching A LOT, to try to get the best product combination for this redo. I finally decided on painting with AS. But I am having too much trouble deciding if I should use wax or a clear sealant. I've read that water based protective finishes tend to yellow the painting as time goes by. And then wax is not protective enough. Do you have any recommendations? Anyone who can recommend a good product to seal the paint? As someone said, I just don't want to put a lot of money and effort and then see it falling apart. Thanks!
ReplyDeleteHi Unknown! I hope you get this reply. I used wax on the uppers since the uppers do not tend to get as much wear and tear. I wish I would have been patient though and waited on ordering a clear sealant because now that I am wanting to paint the bottoms I will have to redo the tops since the bottoms will require a clear sealant. The clear sealant that was recommended to me was Artisan Enhancements. You can order it from Robyn Story Designs. I have not heard any complaints on it yellowing. I have some but have not tried it out yet but only hear good things. Another top coat I hear good things about comes in a gallon size from Lowes. It is actually for sealing floors and is called Varathane. I have not tried it and it is a poly so you may want to research the yellowing on that specific brand. I believe if the poly if water based you will have no yellowing. Have you asked an Annie Sloan Stockiest about Annie's clear top coat? They should know if it yellows or not over time. I have not used it either so really I hate to say I am of no great help. Please keep in mind if you are wanting to age your cabinets and use a clear top coat do a clear top coat first then use a glaze and then seal with the clear top cats/coats. If you apply the gaze before sealing it you will ruin your paint job. The glaze will soak into your paint just like a dark wax would. Good luck on your project! It is a lot of work but well worth it in the end!
DeleteThank you so much for your post. It is gorgeous. I live in my kitchen so wax wont work but I want to age it and you do so by using the dark wax as the last step could I use wood stain and then seal? Or would that ruin all my hard work? Thank you again.
ReplyDeleteThis comment has been removed by the author.
ReplyDeleteI wanted to thank you for your inspiration. I can say I'm sold on Annie Sloan paint. There is truly a technique for applying all paint coats and wax. It was your detailed pictures that gave me the extra push I needed to do all 43 cabinet doors. It took me approx a month to do framing and all doors but the results are amazing. I have read what seems like hundreds of blogs/post about waxing vs clear coat. I did the soft wax on the front (several hundred reviews/blogs stated it seals your paint and protects them) and love love how they look finished. I did do a test door of polycrylic (no yellowing) vs polyurethane. I can say I would have been disappointed with the finished look. Thank you again, from a now happy cabinet makeover mom!
ReplyDeleteThe colors are beautiful and it's really easy to work with..Hotel furniture...I love painting furniture too much. décor
ReplyDeleteI wanted to paint my Kitchen Cabinets with ASCP but was very hesitant due to cleaning after painting. You've inspired me and I'm going to do it! I'm also backlogged with many painting "to do's" that I've put off and now working on my deck completing those projects. Lazy Susan, three lamps and a couple of others...thank you for your blog!
Delete