Wednesday, October 12, 2011

Oh Junking Fairy!!

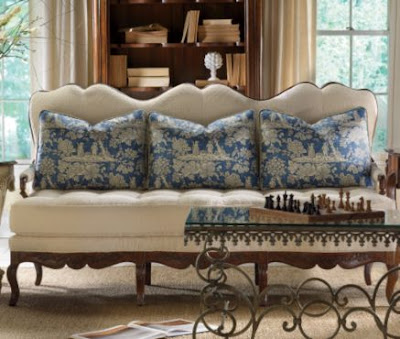
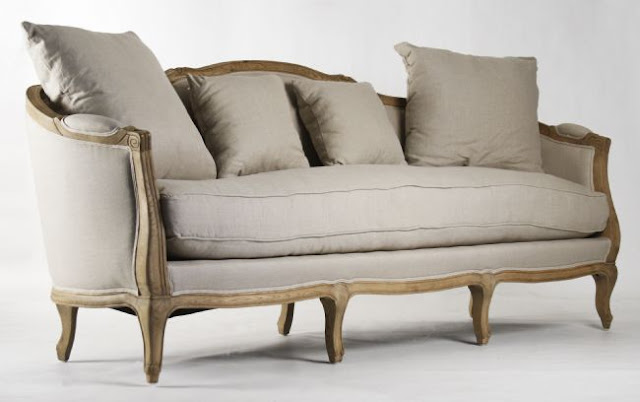
So I was perusing the local yard sale site today and my oh my what did my wondering eyes find!!  The wheels in my head started turning double speed and I emailed the link to The Hubster who in turn thought I had lost my mind. He was not amused in the least.

When I look at her my eyes get classy.

I see what great bones she has.


I see how beautiful she must have been at some point in time.
I see how beautiful and dreamy she could be!! If I only knew how to reupholster I would have been over to the ladies house in a minute. She just emailed me and said she is 72 inches long and still in need of a loving home. Sigh....So yes Junking Fairy if you happen to have the time I would so love for you to pick her up and bring her to me!;)

I really am not crazy just a dreamer!:)

Hope your Wednesday is going well!


Tuesday, October 11, 2011

Mini Chalk Boards

I went back to HomeGoods today in search of a third pedestal frame and surprisingly enough they had two left! I was sure they would be sold out but they were not and so I took it as a sign that I was suppose to follow thru with this project!;)

I also purchased Peel & Stick chalk board made by Wallies. My thought at first was to have The Hubster cut me out small pieces of wood that I was going to paint with chalk board paint so that I could turn the frames back into actual frames some day if I wanted to. Well he said why don't you use that stick on stuff. Okay, so I guess he does have good ideas every now and then!;) 

This project took all of 10 minutes! The Peel & Stick Chalk Board was super easy to stick on and did not leave any bubbles! Super easy to peel off as well which is a major plus. I had to reposition one of them. Thankfully it came with some chalk as well because I did not have any on hand and would have been majorly bummed.

I really like these pedestal frames as chalk boards! I can use them in a grouping for the seasons or by themselves. They would be great as names for place settings or even for labeling dishes during a dinner buffet party. Very versatile I think.

Though I loved how easy the Peel & Stick was to use I was NOT happy that all it took to scratch it was my finger nail!:( Now I will have to redo this one.

Hope your week is going well!
Linking up to the following Linky Parties:
Table Top Tuesday
Wow Us Wednesday


Sunday, October 9, 2011

Curtains Up!

This is the view I have now from my desk here in the kitchen where I do all this blogging madness. Before I take you in to see the new guest room curtains let me show you where this room started.

Here is the guest room before we moved in. At the time I saw plain and boring builder beige walls.

I then decided that I wanted to bring color into this room and do a whimsy cottage chic feel if that is even a style. Ha! I got the brilliant idea to paint the headboard The Hubster and I made red. I use the term brilliant loosely. The red headboard is STILL out in the garage. I strip a bit off of it everyday. Hoping by Thanksgiving it will be completed and back in the room just in time for our holiday guests!

Here is the guest room today with the antique shutters hung and the new curtains up! Yes, this is where you can state the obvious that indeed I painted the room back to it's almost original color. All I have to say is that it is fun watching  on our blogs how much our taste change and evolve over the years. 

I flipped thru some of my fave inspiration magazines trying to get an idea on what type of rod to use to hang the panels. Most of them showed a very simple ball ended rod. Easy enough and thankfully WM had one because I was not wanting to run to HobLob last night. I used just plain clips instead of sliding the curtain panels straight onto the rod. I wanted the little extra length that clips provide you.

I love how they puddle just a tad!

I had two pairs of curtains. One was the lace and the other were just plain white panels. I decided that I wanted to continue to have the room feel bright and airy so I went with the scalloped lace panels. They believe it or not were just $14.99 for the pair at Ikea!! They are called Alvine Spets if you are interested in getting a pair of your own. I highly recommend them!

I am very thankful that I was able to pull off the vision I had for the window. Sometimes ya just never know! Total cost to achieve this look was a tad less than $50. The most expensive thing was the rod at $14 and the two set of clips at $7 each. I paid less than $5 for the pair of antique shutters and the Ikea scallop lace panels were just $14.99. 

And a special thanx to my very helpful assistant today! Littliest helped to make sure everything was just right during the photo shoot!;)

Hope your weekend is going well! Thanx so much for taking the time out of your day to stop by and say Hi!

I am linking up to the following linky parties:
Sunday Showcase Party
Metamorphosis Monday
Amaze Me Monday
Show Off Your Cottage Monday
Nifty Thrifty Tuesday