Friday, October 18, 2013

Outdated French Dining Chair Makeover With Chalk Paint & Ballad Bouquet Fabric

I have been busy finishing up some of the final details for the kitchen reveal. 
Back in the spring time I found four of these french chairs. Two will end up in the dining room when I get a chance to make them over. One of them is for the kitchen at our built in desk area. The chairs were in perfect condition. They just needed to be updated.
The first chore was to deconstruct the chair. This was my first time attempting an upholstery job on my own so I was nervous. I made sure to  take pictures of each and every step before ripping everything off so I could refer back to the pics when putting the chair back together. Trust me this was a life saver!
It took me about an hour and half to get the chair down to this point. Thankfully the seat was in mint condition so I did not have to do anything to it.
After I deconstructed the chair the next chore and the easiest was to paint the chair. Here is what the finish looked like. Very yellow and dated.
I dry brushed on a few different colors of chalk paint I had on hand to achieve a time worn finish. Very simple to do and only took about out 30 minutes.
Covering the seat of the chair took a bit longer, right at around three hours. Part of that was a learning curve from using my air compressor staple gun myself for the first time. Usually The Hubster is in charge of the gun. If you are going to be doing upholstery work on a regular basis I recommend investing in an air compressor with the nail gun and staple gun attachments. I first attempted to attach the fabric with my electric stapler and it was not strong enough. The staples refused to go in the wood. You can get a really great deal on one around Thanksgiving. I think we paid about $75 for ours a few years back when it was on special for Thanksgiving.
The back of the chair was the most challenging part for me.   This is where the pictures I took as I deconstructed the chair came in to major play. All in all I would say that this chair makeover took me about 10 hours. Hopefully now that I have completed this chair the next three will go by more quickly. 
The fabric I chose to use on the seat is Ballad Bouquet by Waverly. I dug it out from my stash of fabrics but I found that you can purchase it here
I am obsessed with Buffalo Check so of course I had to use some on the back of the chair. I purchased it from Ikea!
The trim I chose is a jute trim purchased from Hobby Lobby and hot glued on. 
I can not wait to show y'all how it looks in the kitchen! Off to sew a few curtain panels and then the kitchen will be ready for its photo shoot.

Thanx for stopping! Do not forget Treasure Hunt Thursday is going on strong so be sure to stop by the party!


Linking up to the following linky parties:
That DIY Party
Metamorphosis Monday
Tuesday Treasures
Inspire Me Tuesday
Nifty Thrifty Tuesday
Wow Us Wednesdays
Furniture Feature Friday

Thursday, October 17, 2013

Treasure Hunt Thursday #128 & Highlights

With a new blog look comes new THT party buttons!:) I do not know about you but I LOVE the new THT button. If you love it too be sure to go to my sidebar and grab the new buttons for your blog.

THT keeps growing every week which is exciting! Be sure to invite all your friends. The more the merrier!
 Here are my top picks from last weeks THT.

Our Home Away From Home- Fall Home Tour 
A Walk In The Countryside- Grain Sack Art
So Much Better With Age- Vintage Pumpkin Tutorial
Zu Haus At Home- Pre Thanksgiving Table
Twigg Studios- Fall Yumminess 
Let's get this party started shall we!?

Common Courtesies


1. Please only link up new links that you have not shared before. 


2. Please link up only 3 times. If you have more you would like to share save the share till the next THT so it will be just as awesome.


3. Please do not link up items you are trying to sell or other linky parties.


4. Please be sure to link back to THT. Hint hint I will only feature those who have the link back. 


5. Disable Word Verification to encourage more comments from your visitors!:)


I would love to have you follow along with me if you do not already!


Can't wait to see what you have to share this week.

Wednesday, October 16, 2013

Most Viewed Links from THT #127

Every week Treasure Hunt Thursday keeps getting larger and larger! Let's see who had the most viewed links from last weeks THT.

1. Old Things New- DIY Cloche
2. Divine Theatre- Craigslist Treasures
3. Housepitality Designs- Fall Centerpiece

Thank you ladies for coming to the party! Be sure to grab the NEW "I've Been Featured" button from my side bar.

See everybody back here today at 4 p.m. for THT #128!

Monday, October 14, 2013

You Too Truly Can Paint A Pumpkin!

Last month Jennifer over at Jennifer Rizzo Designs shared a tutorial on how to paint a pumpkin. She made it look so easy and thus I figured it would be a great project to do with Oldest & Littliest.
After heading to Michaels for a few supplies we were ready to get started.
Jenn's tutorial is step by step which made it very easy to follow even for a 7 year old and...
a 9 year old. I still can not believe this guy is 9 but I digress.
The boys decided that we needed to make our backgrounds look like the evening.
And just so you do not think we...um I...did not make a mess I thought I would share this shot!;)
We were done with this project in about an hour or so even with dry time.
Here is my finished pumpkin. I had intended it to be a cream colored pumpkin but it morphed into an orange one.

 I hope that Jennifer shares more painting tutorials in the future for my boys and I to try. You seriously do not have to have any prior painting skills to do this! I paint walls and furniture but never have I ever painted a scene before. All in all I think it came out pretty ok and it was a great time shared with my boys.

Thank you Jennifer for sharing your creativity and skills with us all!

Linking up to the following linky parties:
Tuesday Treasures
Nifty Thrifty Tuesday
Inspire Me Tuesday
Wow Us Wednesday
Fabulously Creative Friday


Sunday, October 13, 2013

How I Found My Style Sundays- Chateau Chic


Thank you, Pamela, for inviting me to be a part of your series,
"How I Found My Style Sundays."

My name is Mary Alice from Chateau Chic,
and I'm delighted to be joining Pamela and her readers today.


Sooo...
How did I find my decorating style?

I'd have to say...it all started with my maternal grandmother.


From the time I grew up until now, our home was filled
 with antiques and lovely collectibles...thanks to my grandmother.

She could spot a diamond in the rough
better than most in her day.


I have two family pieces 
that I treasure dearly...and would never sell.

An antique highboy from the 1700's
with all of its original glass knobs...


and a farm table that goes back a couple of generations.


Our first home was mostly filled with antiques that
my grandparents had collected and stored over time.

Over the years, as we added pieces to our home,
I tended to gravitate to less formal pieces,


antiques with original paint,


as well as recently painted vintage pieces.


I'm not sure there's a specific name for my style...


Basically, I love the mix!
I don't follow any rules when decorating my home.
I buy what I love (if it's affordable),
knowing I'll find a place for it.

Living in a cookie cutter home, I'm always looking for ways 
to make it stand out from the pack...

Some easy things I've done to try and add charm
and make it unique is to incorporate 

architecturals...


chandeliers...


and vintage collections of all sorts...I have way too many of these.


As the name of my blog would suggest,
I love the inclusion of vintage French accessories...like
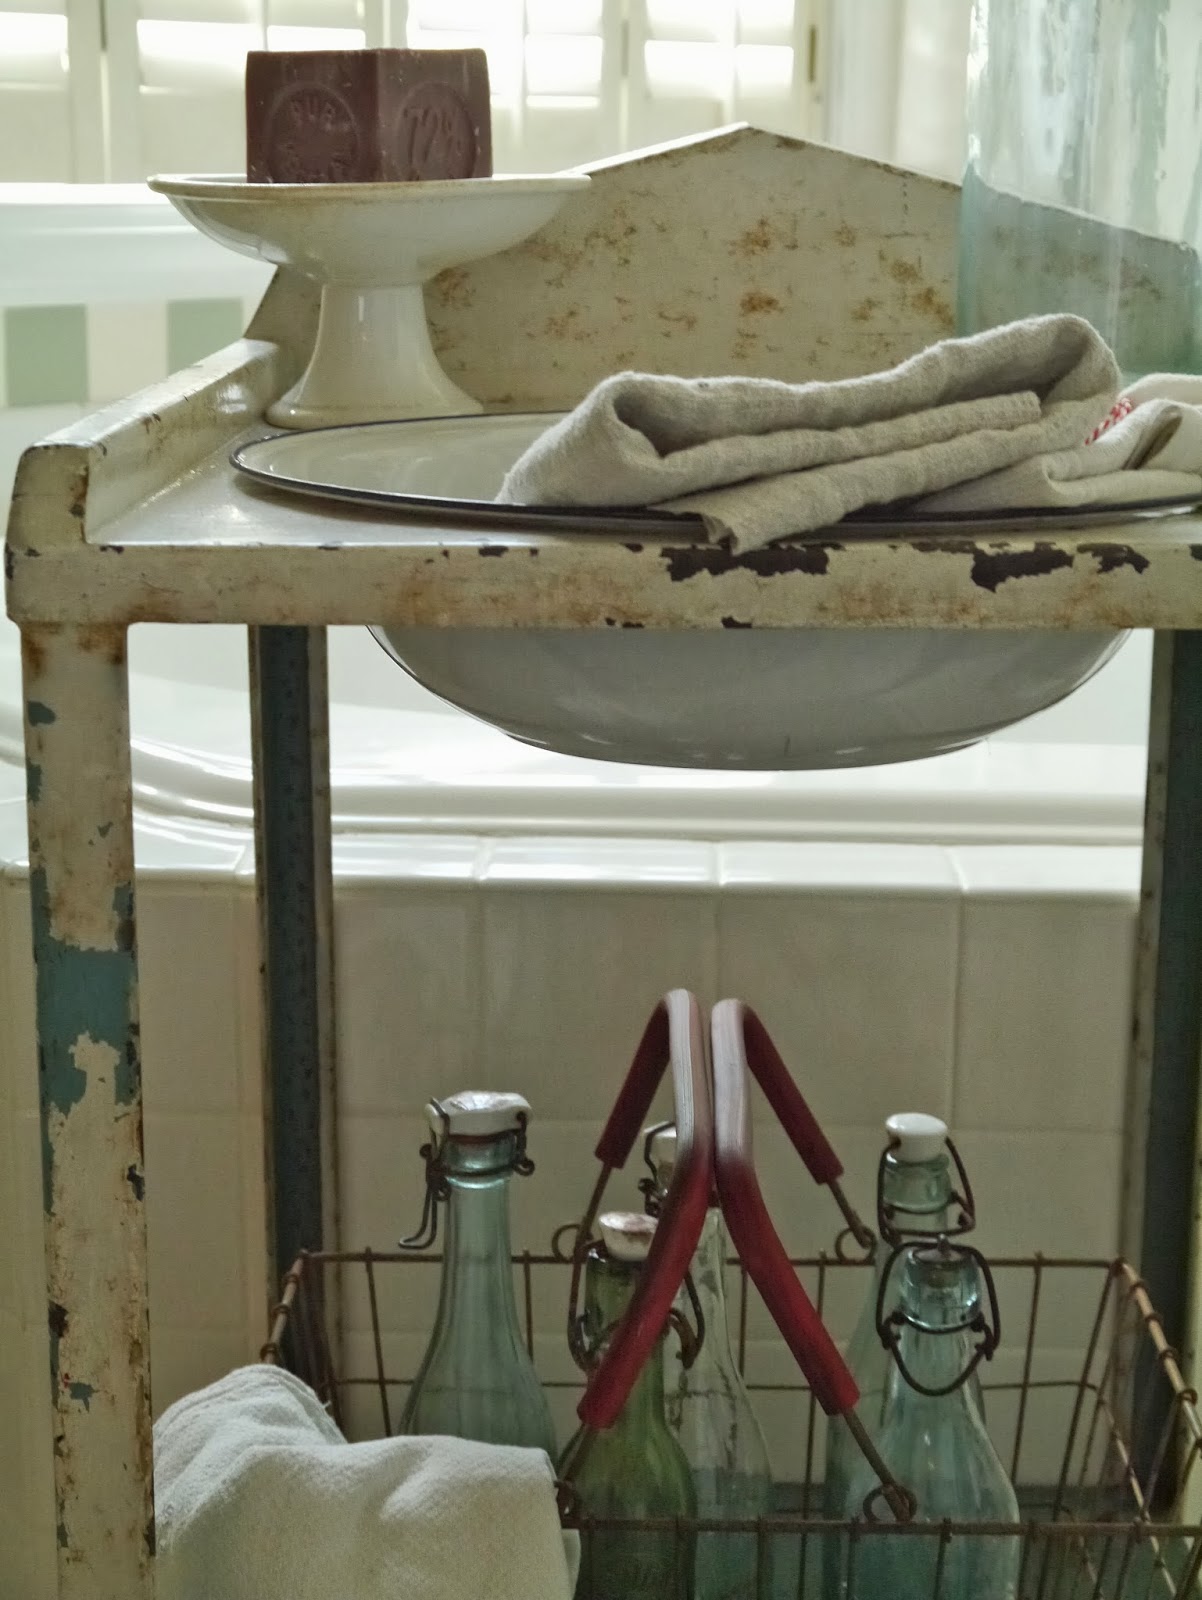
enamelware, old scales, grain sacks,  
wire baskets, metal washstands, breadboards...
just to name a few.


Let's just say...
 the nonpretentious beauty in the simplicity of certain
vintage French decor really speaks to me.


My philosophy for creating a beautiful home
is to always, always stay true to yourself.
Buy what you love and what makes you smile,
and you'll never go wrong.

I'm all about the details. Less is not more to me
when it comes to adding layers of vintage goodness.


To sum it all up...

My goal is to create a comfortable and pleasant haven
where family and friends feel special and well cared for.


Mary Alice thank you so much for visiting with us today and sharing your home. I have enjoyed visiting with you because you included some spaces I had not yet seen of your beautiful home.